Mobile Antivirus

Written by symoon on Saturday, May 15, 2010 at 8:08 PM

                                                      TrendMicro-Mobile-Security Anti-virus


                                                       Kaspersky Antivirus_v 6.0.7
  (Key:- aaaaa aaaaa aaaaa aaaa3)


Key:- (aaaaa~aaaaa~aaaaa~aaaa3)


MediaMonkey Gold 3.0.7.1191 Portable

Written by symoon on Thursday, April 29, 2010 at 10:55 PM

                                            MediaMonkey Gold 3.0.7.1191 Portable | 12.76 Mb

MediaMonkey Gold is a music manager and media jukebox for serious music collectors and iPod users. It catalogs your CDs, OGG, WMA, MPC, FLAC, APE, WAV and MP3 audio files.It includes a CD ripper, CD/DVD Burner, and audio converter for saving music, and manual or automated playlist editors for creating music mixes.

All MediaMonkey Gold Features:

- Audio / Music Manager
- Media Player (play MP3, OGG, WMA etc.)
- Equalizer / DSP Effects / Volume Leveler
- Party Mode & Auto-DJ
- CD Ripper: Encode MP3, OGG, WMA, FLAC
- Audio Converter
- Auto Renamer / File Organizer
- Auto Tag Editor with Album Art Lookup
- Find Duplicate Tracks and Missing Tags
- Playlist Manager (auto music mixes)
- Generate reports and statistics
- Customization via scripts
- iPod and MP3 Player Synchronization
- Integrated CD/DVD Burner (Audio & Data) (up to 48x) (up to 4x)
- File Monitor (automatically updates library)
- Advanced Searches and AutoPlaylists
- Advanced Portable Device Synchronization with on-the-fly format conversion
- Unlimited MP3 encoding
- Virtual CD / Previews
- Advanced Filters
- Sleep Timer


Oracle Database 11g, A Beginner's Guide

Written by symoon on at 8:13 PM

                                        Michael Abbey, "Oracle Database 11g, A Beginner's Guide"
                                                               PDF | 432 pages | 5 MB


Oracle Database 11g is one that comes with much anticipation. We are at a time when data is exploding and the cost of operations must be reduced. Oracle 11g is a release that addresses many of these concerns and provides a database that can help organizations move forward without boundaries.


nLite

Written by symoon on Monday, April 12, 2010 at 3:27 PM


 nLite software is a very useful software. In this software you can make unattended XP Installation CD and Window 2000, 2003 unattended installation CD. So hurry download it and enjoy your installation life.


Service Pack: You will now be prompted for the location of the Windows Service Pack you would like to integrate into the installation. When you are finished, click “Next”.
Hotfixes, Addones and Update Packs: Here you can set your unattended installation CD to install the Windows updates during the installation process. In order to do this, you need to download all of the updates from Microsoft and save them to a folder. Once you download them, click “Insert” and select them all. Then click “Next”.
Drivers: Now you can select what specific drivers you want to preinstall with Windows besides the ones that are installed by default. If you don’t have any just click “Next”.
Components: : Here you will be able to choose which Windows components not to install. When you are finished, click “Next”.
Unattended: Now you will be able to set up the unattended part of the installation. If you have a product key, enter it here so you aren’t prompted for it during the installation. You can also tweak all of the other predefined settings. When you are finished, click “Next”.
Options: Here you will be able to change settings such as the language, install path or set up OEM branding. When you are finished, click “Next”.
Tweaks: Here you can tweak various other Windows settings that you would normally set up after the installation finishes. Click “Next” when you are finished.
Bootable ISO: Now you can create an ISO file for your new Windows XP unattended installation CD. You can also burn the the files directly to a CD without creating an ISO.Then Burn it in Blank CD.


Unattended (Automatic) XP Installation

Written by symoon on at 1:02 PM


Today I discuss you an interesting subject it name Unattended XP Installation. It means in your absence XP installations will be completed by an automated processes. When we install xp in our computer we must sit in front of pc, because in the middle of installation we provide some information such as- Product Key, Computer Name, User Name and Password, Language and Time Zone setting and other. After see this article you don’t need to wait till XP installation complete. So let’s go to see how it crate.

Setp1: Download nLite and install it. When you are finished run the program.

Setp2: Select your language and click “Next”.


Setp3: You will now be asked to locate your Windows installation files. Click browse and choose your Windows XP installation CD. You will also be asked where you would like to save your Windows XP installation files. Create a new folder, name it whatever you like, and click “Ok”. nLite will now begin to copy the installation files from the CD to the folder you created. When it is finished, click “Next”. 


Setp4: Then click “Next” again. Then click “Unattended” in this Task Selection section and then click “Next”. 


General: You can put same setting like this Image to give below. You must change only Product Key. (Don’t click Next) 


Users: In this section you can add User Name and Password. Which is need to login in XP. (Don’t click Next)


Owner and Network ID: In this section you can type your Computer Name, Full Name, Workgroup and Organization Name. (Don’t click Next)  


Regional: In this section set your Language and Time zone. (Don’t click Next) 


Network Settings: In this section set your IP Address. If you don’t have an idea in IP then just set Default. (Don’t click Next) 


Desktop Theme: You can set your XP theme. (Don’t click Next


)Automatic Updates: If your XP Operating System is not pirated you can set it “Enable”. Otherwise set it “Disable”. (Don’t click Next) 


Display: You can set Color Depth, Screen Resolution and Refresh Rate. Then click “Next”.


Step5: In this section click “yes”After complete this process you can see total CD Size. Then click “Next”.


After complete this process you can see total CD Size. Then click “Next”.


Step6: In this section you can create Bootable ISO Image. Mode- set “Create Image”, Label- type you’re Image Name, ISO Engine and Boot Sector- set “Default”. After complete that setting, and then click “Make ISO”. Then click “Finish”.


After making ISO Image you can burn it in blank CD.

And there you have it, your very own Windows XP unattended installation CD. If you have any problem with that please contact with me or commented on this post.

Close All Windows Programs quickly

Written by symoon on Saturday, April 10, 2010 at 10:06 AM

A cool tip to minimize and maximize all your active windows programs. You can do all using your mouse, but if you want to do this with keyboard then simply press Windows key+M to minimize all active programs and later maximize it using Windows key+Shift+M.

If you want to minimize the all active windows programs one by one then use the shortcut by pressing Alt+Space+N keys and sequentially maximize the active windows programs using shortcut Alt+Space+X keys.

create digital photo album presentation in PowerPoint

Written by symoon on at 10:03 AM

In Microsoft PowerPoint, you can create a digital photo album of your scanned photographs to represent as slide show presentation. Using this feature, you can display your business photo album on the web. Once you have converted it into HTML document, PowerPoint will allow you to publish this album to the internet. You can create unlimited albums and also add unlimited photos in each album.

Follow the given steps to create a digital photo album of your scanned photographs:

First create a folder of your scanned pictures or transfer from your digital camera or download from the web.

Now click on "Picture" option from the "Insert" menu then click on "New Photo Album" option.


Here a small dialog box will appear with "Photo Album" title. Now click on "File/Disk" button under "Insert picture from" area to add first picture in album.

Here you can add unlimited picture in one album. If you want to get pictures from scanner or camera then click on "Scanner/Camera" button.


Now you can add effects to your pictures, for example rotates picture to different directions, background colors, picture brightness and contrast levels.


Now under "Album Layout" area, you can choose the best picture layout, Frame shape and add design template also for your photos album.
Once you have selected the all required pictures and layouts for your photo album then click on "Create" button to start the process.


Now "Save" the file and then run this photo album in Slide Show.

Restore the Windows Default Icons

Written by symoon on Monday, April 5, 2010 at 5:15 PM

You can restore the all windows default desktop icons, if you accidentally deleted them from your computer desktop.

List of windows default icons.

• My Computer
• Internet Explorer
• My Documents
• My Network Places
• Recycle Bin

Here we are discussing the recovering process of four windows default icons “My Computer, Internet Explorer, My Documents and My Network Places’ and we will cover recovery process of the Recycle Bin icon in next tip.


Fellow the given steps to restore the windows default icons:

• Go to Start Button and open Run then type the given command to open windows Desktop items dialog box.

Control desk.cpl,,@Web

• Simple copy the above command and paste it in Run box and press Ok,


• Now “Desktop Items” dialog box will appear with different options.

• Under the “General” tab, select the all check box in “Desktop icons” area or click on “Restore default” button to restore the all default icons on your computer desktop.

• Press Ok to close the entire dialog box.

Make Your Windows Fast As Never BeforeMake Your Windows Fast As Never Before

Written by symoon on at 5:10 PM

Disable CD Autorun
( WinXP PRO Only)

1) Click Start, Run and enter GPEDIT.MSC
2) Go to Computer Configuration, Administrative Templates, System.
3) Locate the entry for Turn autoplay off and modify it as you desire.

Speed Up Browsing

When you connect to a web site your computer sends information back and
forth. Some of this information deals with resolving the site name to an
IP address, the stuff that TCP/IP really deals with, not words. This is
DNS information and is used so that you will not need to ask for the site
location each and every time you visit the site. Although Windows XP and
Windows XP have a pretty efficient DNS cache, you can increase its overall
performance by increasing its size. You can do this with the registry
entries below:

Windows Registry Editor Version 5.00
[HKEY_LOCAL_MACHINE\SYSTEM\CurrentControlSet\Services\Dnscache\Parameters]
"CacheHashTableBucketSize"=dword:00000001
"CacheHashTableSize"=dword:00000180
"MaxCacheEntryTtlLimit"=dword:0000fa00
"MaxSOACacheEntryTtlLimit"=dword:0000012d

Make a new text file and rename it to dnscache.reg. Then copy and paste
the above into it and save it. Merge it into the registry.

DISABLE INDEXING SERVICES

Indexing Services is a small little program that uses large amounts of RAM
and can often make a computer endlessly loud and noisy. This system
process indexes and updates lists of all the files that are on your
computer. It does this so that when you do a search for something on your
computer, it will search faster by scanning the index lists. If you don't
search your computer often, or even if you do search often, this system
service is completely unnecessary. To disable do the following:

1. Go to Start
2. Click Settings
3. Click Control Panel
4. Double-click Add/Remove Programs
5. Click the Add/Remove Window Components
6. Uncheck the Indexing services
7. Click Next

OPTIMISE DISPLAY SETTINGS

Windows XP can look sexy but displaying all the visual items can waste
system resources. To optimize:

1.Go to Start
2. Click Settings
3. Click Control Panel
4. Click System
5. Click Advanced tab
6. In the Performance tab click Settings
7. Leave only the following ticked:
- Show shadows under menus
- Show shadows under mouse pointer
- Show translucent selection rectangle
- Use drop shadows for icons labels on the desktop
- Use visual styles on windows and buttons

SPEEDUP FOLDER BROWSING

You may have noticed that everytime you open my computer to browse folders
that there is a slight delay. This is because Windows XP automatically
searches for network files and printers everytime you open Windows
Explorer. To fix this and to increase browsing significantly:

1. Open My Computer
2. Click on Tools menu
3. Click on Folder Options
4. Click on the View tab.
5. Uncheck the Automatically search for network folders and printers check
box
6. Click Apply
7. Click Ok
8. Reboot your computer

REMOVE THE DESKTOP PICTURE

Your desktop background consumes a fair amount of memory and can slow the
loading time of your system. Removing it will improve performance.

1. Right click on Desktop and select Properties
2. Select the Desktop tab
3. In the Background window select None
4. Click Ok

DISABLE UNNECESSARY SERVICES

Because Windows XP has to be all things to all people it has many services
running that take up system resources that you will never need. Below is a
list of services that can be disabled on most machines:

Alerter
Clipbook
Computer Browser
Distributed Link Tracking Client
Fast User Switching
Help and Support - (If you use Windows Help and Support leave this
enabled)
Human Interface Access Devices
Indexing Service
IPSEC Services
Messenger
Netmeeting Remote Desktop Sharing (disabled for extra security)
Portable Media Serial Number
Remote Desktop Help Session Manager (disabled for extra security)
Remote Procedure Call Locator
Remote Registry (disabled for extra security)
Remote Registry Service
Secondary Logon
Routing & Remote Access (disabled for extra security)
Server
SSDP Discovery Service - (Unplug n' Pray will disable this)
Telnet
TCP/IP NetBIOS Helper
Upload Manager
Universal Plug and Play Device Host
Windows Time
Wireless Zero Configuration (Do not disable if you use a wireless network)

Workstation
To disable these services:

Go to Start and then Run and type "services.msc"
Doubleclick on the service you want to change
Change the startup type to 'Disable"

REMOVE ANNOYING DELETE CONFIRMATION MESSAGES

Although not strictly a performance tweak I love this fix as it makes my
machine 'feel' faster. I hate the annoying 'are you sure?' messages that
XP displays, especially if I have to use a laptop touchpad to close them.
To remove these messages:

1. Right-click on the 'Recycle Bin' on the desktop and then click
'Properties'

2. Clear the 'Display Delete Confirmation Dialog' check box and click 'Ok'


If you do accidently delete a file don't worry as all is not lost. Just go
to your Recycle Bin and 'Restore' the file.

Run Commands In Windows XP

Written by symoon on at 5:06 PM

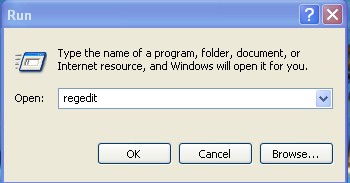
You can access all these programs by going through START/RUN or Simply Click
Windows Key+r


1. Sound Recorder - Sndrec32


2. SQL Client Configuration - cliconfg


3. System Configuration Editor - sysedit


4. System Configuration Utility - msconfig


5. System File Checker Utility (Scan Immediately)- sfc /scannow


6. System File Checker Utility (Scan Once At Next Boot)- sfc /scanonce


7. System File Checker Utility (Scan On Every Boot) - sfc /scanboot


8. System File Checker Utility (Return to Default Setting)- sfc /revert


9. System File Checker Utility (Purge File Cache)- sfc /purgecache


10. System File Checker Utility (Set Cache Size to size x)-sfc/cachesize=x


11. System Information - msinfo32.


12. Task Manager – taskmgr


13. System Properties - sysdm.cpl


14. Task Manager – taskmgr


15. TCP Tester - tcptest


16. Telnet Client - telnet


17. Tweak UI (if installed) - tweakui


18. User Account Management- nusrmgr.cpl


19. Utility Manager - utilman


20. Windows Address Book - wab


21. Windows Address Book Import Utility - wabmig


22. Windows Backup Utility (if installed)- ntbackup
23. Windows Explorer - explorer


24. Windows Firewall- firewall.cpl


25. Windows Magnifier- magnify


26. Windows Management Infrastructure - wmimgmt.msc


27. Windows Media Player - wmplayer


28. Windows Messenger - msmsgs


29. Windows Picture Import Wizard (need camera connected)- wiaacmgr


30. Windows System Security Tool – syskey


31. Windows Update Launches - wupdmgr


32. Windows Version (to show which version of windows)- winver


33. Windows XP Tour Wizard - tourstart


34. Wordpad - write


35. Volume control for soundcard - Sndvol32


36. Password Properties - password.cpl


37. Performance Monitor - perfmon.msc


38. Phone and Modem Options - telephon.cpl


39. Phone Dialer - dialer


40. Pinball Game - pinball


41. Power Configuration - powercfg.cpl


42. Printers and Faxes - control printers


43. Printers Folder – printers


44. Private Character Editor - eudcedit


45. Quicktime (If Installed)- QuickTime.cpl


46. Real Player (if installed)- realplay


47. Records programs crash & snapshots - Drwatson


48. Regional Settings - intl.cpl


49. Registry Editor - regedit


50. Registry Editor - regedit32


51. Remote Access Phonebook - rasphone


52. Remote Desktop - mstsc


53. Removable Storage - ntmsmgr.msc


54. Removable Storage Operator Requests - ntmsoprq.msc


55. Resultant Set of Policy (XP Prof) - rsop.msc


56. Scanners and Cameras - sticpl.cpl


57. Scheduled Tasks - control schedtasks


58. Security Center - wscui.cpl


59. Services - services.msc


60. Shared Folders - fsmgmt.msc


61. Shuts Down Windows - shutdown


62. Sounds and Audio - mmsys.cpl


63. Spider Solitare Card Game - spider


64. Malicious Software Removal Tool - mrt


65. Microsoft Management Console - MMC


66. Microsoft Access (if installed) - access.cpl


67. Microsoft Chat - winchat


68. Microsoft Excel (if installed) - excel


69. Microsoft Frontpage (if installed)- frontpg


70. Microsoft Movie Maker - moviemk


71. Microsoft Paint - mspaint


72. Microsoft Powerpoint (if installed)- powerpnt


73. Microsoft Word (if installed)- winword


74. Microsoft Syncronization Tool - mobsync


75. Minesweeper Game - winmine


76. Mouse Properties - control mouse


77. Mouse Properties - main.cpl


78. Nero (if installed)- nero


79. Netmeeting - conf


80. Network Connections - control netconnections


81. Network Connections - ncpa.cpl


82. Network Setup Wizard - netsetup.cpl


83. Notepad - notepad


84. Nview Desktop Manager (If Installed)- nvtuicpl.cpl


85. Object Packager - packager


86. ODBC Data Source Administrator- odbccp32.cpl


87. On Screen Keyboard - osk


88. Opens AC3 Filter (If Installed) - ac3filter.cpl


89. Outlook Express - msimn


90. Paint – pbrush


91. Keyboard Properties - control keyboard


92. IP Configuration (Display Connection Configuration) - ipconfi/all


93. IP Configuration (Display DNS Cache Contents)- ipconfig /displaydns


94. IP Configuration (Delete DNS Cache Contents)- ipconfig /flushdns


95. IP Configuration (Release All Connections)- ipconfig /release


96. IP Configuration (Renew All Connections)- ipconfig /renew


97. IP Configuration(RefreshesDHCP&Re-RegistersDNS)-ipconfig/registerdns


98. IP Configuration (Display DHCP Class ID)- ipconfig/showclassid


99. IP Configuration (Modifies DHCP Class ID)- ipconfig /setclassid


100. Java Control Panel (If Installed)- jpicpl32.cpl


101. Java Control Panel (If Installed)- javaws


102. Local Security Settings - secpol.msc


103. Local Users and Groups - lusrmgr.msc


104. Logs You Out Of Windows - logoff.....


105. Accessibility Controls - access.cpl


106. Accessibility Wizard - accwiz


107. Add Hardware - hdwwiz.cpl


108. Add/Remove Programs - appwiz.cpl


109. Administrative Tools control - admintools


110. Adobe Acrobat (if installed) - acrobat


111. Adobe Designer (if installed)- acrodist


112. Adobe Distiller (if installed)- acrodist


113. Adobe ImageReady (if installed)- imageready


114. Adobe Photoshop (if installed)- photoshop


115. Automatic Updates - wuaucpl.cpl


116. Bluetooth Transfer Wizard – fsquirt


117. Calculator - calc


118. Certificate Manager - certmgr.msc


119. Character Map - charmap


120. Check Disk Utility - chkdsk


121. Clipboard Viewer - clipbrd


122. Command Prompt - cmd


123. Component Services - dcomcnfg


124. Computer Management - compmgmt.msc


125. Control Panel - control


126. Date and Time Properties - timedate.cpl


127. DDE Shares - ddeshare


128. Device Manager - devmgmt.msc


129. Direct X Control Panel (If Installed)- directx.cpl


130. Direct X Troubleshooter- dxdiag


131. Disk Cleanup Utility- cleanmgr


132. Disk Defragment- dfrg.msc


133. Disk Management- diskmgmt.msc


134. Disk Partition Manager- diskpart


135. Display Properties- control desktop


136. Display Properties- desk.cpl


137. Display Properties (w/Appearance Tab Preselected)- control color


138. Displays IP configuration - Winipcfg


139. Dr. Watson System Troubleshooting Utility- drwtsn32


140. Driver Verifier Utility- verifier


141. Event Viewer- eventvwr.msc


142. Files and Settings Transfer Tool- migwiz


143. File Signature Verification Tool- sigverif


144. Findfast- findfast.cpl


145. Firefox (if installed)- firefox


146. Folders Properties- control folders


147. Fonts- control fonts


148. Fonts Folder- fonts


149. Free Cell Card Game- freecell


150. Game Controllers- joy.cpl


151. Group Policy Editor (XP Prof)- gpedit.msc


152. Hearts Card Game- mshearts


153. Help and Support- helpctr


154. HyperTerminal- hypertrm


155. Iexpress Wizard- iexpress


156. Indexing Service- ciadv.msc


157. Internet Connection Wizard- icwconn1


158. Internet Explorer- iexplore


159. Internet Setup Wizard- inetwiz


160. Internet Properties- inetcpl.cpl

CCNA: Cisco Certified Network Associate Study Guide, Third Edition

Written by symoon on Sunday, March 28, 2010 at 9:35 PM


CCNA: Cisco Certified Network Associate Study Guide, Third Edition | 5.6 Mb


Welcome to the exciting world of Cisco certification(CCNA)! You have picked up this book because you want something better; namely, a better job with more satisfaction. Rest assured that you have made a good decision.Cisco certification can help you get your first networking job, or more money and a promotion if you are already in the field.


Cisco is the king of routing and switching, the Microsoft of the internet-working world. The Cisco certifications reach beyond the popular certifications, such as the MCSE and CNE, to provide you with an indispensable factor in understanding today’s network—insight into the Cisco world of internetworking. By deciding that you want to become Cisco certified, you are saying that you want to be the best—the best at routing and the best at switching. This book will lead you in that direction.


Virtual Memory

Written by symoon on Saturday, March 20, 2010 at 1:49 AM

Configuring virtual memory properly enables you to optimize the performance of your users computers for running application


Virtual Memory:

Virtual Memory enables the computer to use hard disk space as if it is Random Access Memory (RAM).Virtual memory must be assigned to at least one drive and have a minimum size.


Configure Virtual Memory In Windows XP:

1).Log on your Computer.

2) Open System Properties dialog box by using either of the following method:
    a) Right click on My computer icon and click on properties

    b) Or go to Control Panel and double click on System


3) In this System Properties dialog box, select the Advance tab.

4) Below Performance , click Setting.

5) In the Performance Options dialog box, select the Advance tab.

6) Below Virtual Memory, click Change.

7)Modify the Virtual Memory settings:
    a) To add a page file, begin by selecting the drive on which you want to place the new page file. Enter both  an initial size and a maximum size for the page file and then click Set.

   b) To move the page file to a different hard drive, begin by selecting the drive on which you want to place file and then click Set. Enter both an initial size and a maximum size for the page file and then click Set. Next, select the drive from which you want to remove the page file. Set its initial and maximum sizes to 0 and click Set.

   c) To change either the initial or maximum size of the page file, begin by selectin the drive on which they are stored. Enter the value for the Initial Size or Maximum Size and then click Set.

8) Click Ok to save your changes.

9) Click Ok to close all Open dialog boxes.

10) Test your change by restarting the computer and verifying that it works

Bandwidth Controller Enterprise 1.21

Written by symoon on Thursday, March 18, 2010 at 11:46 PM

Bandwidth Controller Enterprise v1.21 | 5.36 Mb

Bandwidth Controller Enterprise is a scalable traffic shaping solution for corporate networks and service providers. It provides Layer 3 transaction processing for high performance, low latency bandwidth management across the entire organization.

Features:

+ Layer 3 bandwidth manager
+ TCP/IP stream limiting and prioritization
+ Distributed mode for client only networks
+ Traffic monitoring
+ Remote management+ Internet speeds from 56 kbps to 2,400 Mbps
+ Wireless network support
+ Up to 2,000 concurrent users 


Movie Edit Pro 20 Plus

Written by symoon on at 10:37 PM


Movie Edit Pro 20 Plus|195mb


MAGIX Movie Edit Pro 15 Plus is a usefull movie editing software. MAGIX Movie Edit Pro 15 Plus is a complete solution for cutting and editing video.In just 3 simple steps, use your own recordings to create movie projects with professional captions, impressive special effects, and the right background music then burn them onto DVD or Blu-ray Disc.


or


How To Do Everything With javascript

Written by symoon on Friday, March 12, 2010 at 10:51 PM

How To Do Everything With javascript | 8.6 mb

This e-book is designed to help anyone interested in adding elements of interactivity to their personal web pages. Some experience with a PC is required, as we will not cover how to access the Internet or how to use a web browser. You don’t have to be an HTML expert, although it will help if you have some experience with that language. When encountering new HTML for the first time,I will briefly explain what’s going on, but always in the context of JavaScript.

Web Design: Best Studios

Written by symoon on at 10:38 PM

                                                     Web Design: Best Studios | PDF | 51 MB

Who are today's most innovative and successful interactive agencies? Who are the teams creating cutting-edge websites for clients such as Coca Cola, Nike, Adidas, Chrysler, and BMW? For anyone who wants to know who's who in the world of web design, this is the guide to get.


Visual Design for the Modern Web

Written by symoon on Wednesday, March 10, 2010 at 10:15 PM


Visual Design for the Modern Web| PDF | 10.1MB

What this book does teach are design concepts and how to implement them for a web site using HTML, CSS, and baby JavaScript. As a clever reader might guess from the title, the book concentrates on visual design and the characteristics that make a web site usable, engaging, and memorable. Web design is tough, frankly, because of considerations ranging from the technical to the organizational to the aesthetic. As a matter of fact, it’s so tough that the preliminary title for this e-book was Web Design Alchemy, because medieval alchemy blurred the lines between science, art, and magic, and while a wonder-fully designed web site may not be medieval gold, it is indeed magical.


or


Sams Teach Yourself PHP in 24 Hours

Written by symoon on at 9:54 PM

PHP in 24 Hours | CHM | 11.7Mb

This is a book about PHP, arguably the most popular Web scripting language in the world. It is also a book about programming. In the space available, it is neither possible to create a complete guide to programming in PHP nor to cover every function and technique PHP offers.


CompTIA Security+ Study Guide

Written by symoon on at 11:26 AM

CompTIA Security+ Study Guide | PDF | (15.4 MB)

This book presents the material at an intermediate technical level. Experience with and
nderstanding of security concepts, operating systems, and application systems will help
ou get a full understanding of the challenges you face as a security professional.

Download

NETSpeedBoost Professional Edition v6.5

Written by symoon on at 11:11 AM


                                    NETSpeedBoost Professional Edition v6.5 | 1.6 MB

NETSpeedBoost 6.5 Professional Edition! From the original author of the world's most popular internet accelerator - Intelli-Dial-UP, we are proud to announce the official successor - .NETSpeedBoost 6.5 .NETSpeedBoost is a powerful and easy to use self installing program for Windows 95, 98, ME, NT, 2000, XP, and Vista which optimizes your Internet connection speed by up to 1200% faster.


Google Chrome Keyboard Shortcuts.

Written by symoon on Tuesday, March 9, 2010 at 3:19 PM


Here is a complete list of Google Chrome browser keyboard shortcuts for your reference. Only very few shortcuts of Mozilla Firefox were not working with this fine browser. After working few hours one can easily say that it’s the feature.

New Shortcuts:

Task Manager————————————-Shift+Esc 


New Incognito Window————————-Ctrl+Shift+N

Reopen the last tab(closed tab)————–Ctrl+Shift+T

Drag link to tab———————– ——Open the URL in tab

Ctrl+1 to 8————————- ———Switch to the specified tab(left to right)

Ctrl+9—————————————Switch to the last tab

Ctrl+Tab or Ctrl+PgDown—- —————Switch to the next tab

Alt+Home—————– ——————Open the home page

Press Ctrl, and click on a link —————–Open the link in a new tab

Press Shift, and click on a link —————-Open the link in a new window

Space bar————————————Scroll down the web page

Regular Shortcuts:

Bookmark This Page—————————–Ctrl + D

Bookmarks—————————————-Ctrl + B

New Incognito Window————————-Ctrl+Shift+N

Downloads—————————————-Ctrl + J

Help———————————————–No keys

History——————————————–Ctrl + H

Page Source————————————–Ctrl + U

Print———————————————–Ctrl + P

Refresh Page————————————–F5

Refresh Page & Cache—————————Ctrl + F5

Save Page As————————————–No keys

Back————————————————Alt + Left Arrow

Down One Line————————————Down

Down One Page———————————–PageDown

File Open——————————————-Ctrl + O

Find in page—————————————-Ctrl+F

Forward———————————————Alt + Right Arrow

Home Page——————————————Alt + Home

Jump to Address Bar——————————-Ctrl + L

Jump to Search Bar(opens search bar in the address bar)–Ctrl + K

Page Bottom—————————————-End

Page Top—————————————— -Home

Press Ctrl, and click on a link —————–Open the link in a new tab

Press Shift, and click on a link —————-Open the link in a new window

Stop————————————————–Esc

Tab Close—————————————— -Ctrl + W

Tab New—————————————— -Ctrl + T

Tab Next——————————————–Ctrl + Tab

Tab Previous—————————————-Ctrl + Shift + Tab

Tab Select——————————————-Ctrl + [1 - 9]

Up One Line—————————————– Up

Up One Page—————————————–PageUp

Window Close—————————————Alt + F4

Window New—————————————-Ctrl + N

Copy————————————————–Ctrl + C

Cut—————————————————-Ctrl + X

Delete————————————————Del

Task Manager—————————————-Shift+Esc

Text Size Decrease———————————Ctrl + -

Text Size Increase———————————-Ctrl + +

Text Size Default———————————–Ctrl + 0

Undo————————————————- Ctrl + Z

Space bar————————————–Scroll down the web page


NetWorx 5.0.6

Written by symoon on Monday, March 8, 2010 at 5:09 PM

NetWorx 5.0.6 . (3.43 MB)


NetWorx is a powerful tool that helps you objectively evaluate your bandwidth situation. You can use it to collect bandwidth usage data and measure the speed of your Internet or any other network connection. NetWorx can help you identify possible sources of network problems, ensure that you do not exceed the bandwidth limits specified by your ISP, or track down suspicious network activity characteristic of Trojan horses and hacker attacks.


Homepage : softperfect.com 
Platform : Windows 98/2K/XP/2K3/Vista/7 


or


Windows XP Hard Disk Partitions

Written by symoon on at 4:53 PM

Partitions:

A partition is an area of a hard disk that is treated logically as a single unit of storage. A partition can use some or all of the available disk space on a hard disk. In order for a partition to be accessible, you must format it and assign a drive letter to it. A partition can be either primary or extended. A primary partition can be used to boot the computer; an extended partition cannot. You must mark a primary partition as active in order for it to be used to boot the computer.


When you format a disk, you assign a file system to it. Windows XP Support the following file systems:

• FAT
• FAT32
• NTFS


Create a Primary Partition in Widows XP:

1. Log on as local Administrator.

2. Open Computer Management(right-click My Computer and choose Manage)

3. In the console pane, select the Disk Management folder.

4. If you’ve using Windows XP, right click the available free space in the disk on which you want to create a new partition and choose New Partition. The New Partition Wizard starts.

5. Click Next.

6. On the Select Partition Type page, select Primary Partition.

7. Click Next.

8. If you’re using Windows XP, in the Partitions Size in MB text box, type the size of the partition you want to create.

9. Click Next.

10. On the Assign Drive Letter or Path page, select one of the following:
      a.  If you want to assign a permanent drive letter to the new partition, choose a drive letter form  the drop-down list.
      b.  If you want to mount the partition into an empty NTFS folder, enter the Path to the folder or click browser to select a folder.
      c.  If you do not want to assign a drive letter or mount path, select Do Not Assign A Drive Letter Or Drive Path


11. Click Next.

12. Select whether or not format this partition. If you choose to format the partition, you can select from the following options:
      o The file system to use (FAT, FAT32, or NTFS)
      o The allocation unit size. This is the size of the smallest available file-storage unit on the disk, and determines the size of the file clusters.
     o The volume label, a name that’s assigned to the partition.
     o Check Perform a Quick Format if you want to perform a quick format instead of a full format.
     o Check Enable File and Folder Compression to enable compression on the entire partition.


13. Click Next. 

14. Click Finish.

15. Close Computer Management.

16. Verify that the new partition is accessible by using utility such as Windows Explorer or My Computer.


Create a Extended Partition in Widows XP:

1. Log on as local Administrator.

2. Open Computer Management(right-click My Computer and choose Manage)

3. In the console pane, select the Disk Management folder.

4. If you’ve using Windows XP, right click the available free space in the disk on which you want to create a new partition and choose New Partition. The New Partition Wizard starts.

5. Click Next.

6. On the Select Partition Type page, select Extended Partition.

7. Click Next.

8. In the Amount of Disk Space to Use text box, type the size of the partition you want to create.

9. Click Next.

10. Click Finish.

11. Create at least one logical drive within the extended partition.

a. If you’re using Windows XP, right click an extended partition with free space and choose New Logical Drive. The New Partition Wizard starts.

b. Click Next.

c. On the select Partition Type page, click Next.

d. In the Amount of Disk Space to use text box, type the size of the logical drive you want to create.

e. Click Next.

f. On the Assign Drive Letter or Path page, select one of the following:
     • If you want to assign a permanent drive letter to the logical drive, choose a drive letter form the drop-down list.
    • If you want to mount the logical drive into an empty folder, enter the Path to the folder or click browser to select a folder.
    • If you do not want to assign a drive letter or mount path, select Do Not Assign a Drive Letter or Drive Path.


g. Click Next.

h. Select whether or not format this partition. If you choose to format the partition, you can select from the following options:

i. The file system to use (FAT, FAT32, or NTFS)
  • The allocation unit size. This is the size of the smallest available file-storage unit on the disk, and determines the size of the file clusters.
  • The volume label, a name that’s assigned to the partition.
  • Check Perform a Quick Format if you want to perform a quick format instead of a full format.
  • Check Enable File and Folder Compression to enable compression on the entire partition.

j. Click Next.

k. Click Finish.


12. Close Computer Management.

13. Verify that the new partition is accessible by using utility such as Windows Explorer or My Computer.

Delete a Primary Partition in Windows XP:

1. Log on as a local Administrator.
2. Open Computer Management (right click My Computer and choose Manager)
3. In the Console pane, select the Disk Management folder.
4. Right Click the partition you want to delete and choose Delete Partition.
5. Click Yes to confirm that you want to delete the primary partition.
6. Close Computer Management.
7. Verify that the partition is no longer accessible by using a utility such a Windows Explorer or My Computer.


Delete a Extended Partition in Windows XP:

1. Log on as a local Administrator.
2. Open Computer Management (right click My Computer and choose Manager)

3. In the Console pane, select the Disk Management folder.

4. Delete any logical drives within the extended partition first:
   a. Right-click a logical drive and choose Delete Logical Drive.
   b. Click Yes to confirm that you want to delete the logical drive.
   c. Repeat these steps for each for logical drive within the extended partitions.


5. Right click the extended partition you want to delete and choose Delete Partitions.

6. Click Yes to confirm that you want to delete the extended partition.

7. Close Computer Managemetn.

8. Verify that the partition is no longer accessible by using a utility such as Widows Explorer or My Computer.


Network Management

Written by symoon on at 4:32 PM


SEO

Google Translator

Free Download

Custom Search
Related Posts with Thumbnails

About the author

This is the area where you will put in information about who you are, your experience blogging, and what your blog is about. You aren't limited, however, to just putting a biography. You can put whatever you please.